
There’s something primal about a campfire. The crackling flames, the warmth on your face, and the smell of wood burning are all part of what makes camping under the stars so unforgettable. But a great campfire doesn’t just happen—it takes a little knowledge, some patience, and a few tricks up your sleeve to truly master the art of the perfect campfire.
Whether you’re out in the wild or just having a backyard cookout, here’s how to build a fire that’ll not only keep you warm, but will be the heart of your adventure.
Step 1: Gather Your Materials – The Building Blocks
Before you light the match, you’ll need to gather the right materials. This is where the real art comes in—having the right fuel can make all the difference. Here’s what you’ll need:
- Tinder: The first layer of your fire, tinder is the material that will catch the spark and get the fire going. You can use dry leaves, pine needles, grass, or even cotton balls soaked in petroleum jelly. For the best results, try to collect tinder that’s as dry as possible. Tinder is the spark’s best friend.
- Kindling: This is the next layer of your fire and should be small sticks or twigs (about the size of a pencil). Kindling catches the flame from the tinder and helps the fire grow. The key here is to gather kindling that’s dry and small enough to ignite easily but large enough to sustain the fire as it grows.
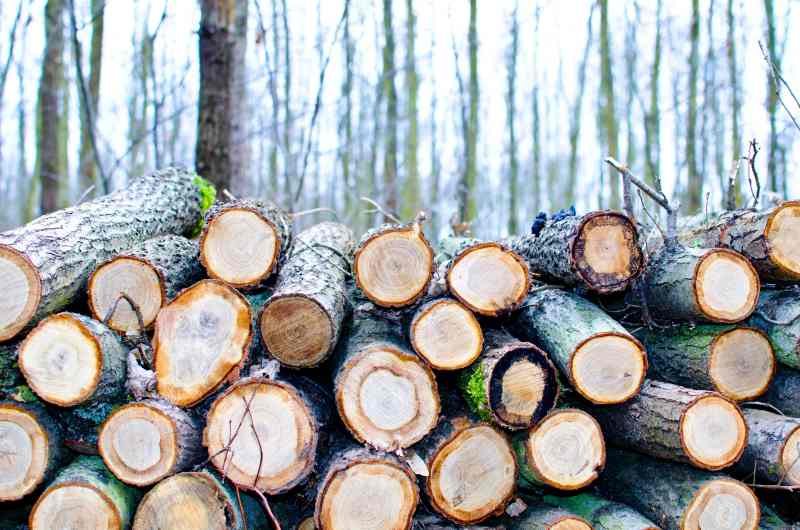
- Fuel Wood: This is the main wood that will keep your fire going. Use medium to large pieces of wood, such as logs, that will burn for a long time. When selecting your fuel wood, pick up dead, dry wood (but don’t cut down live trees!). Hardwoods like oak, hickory, and maple are ideal for a slow-burning fire, while softer woods like pine will burn fast and hot but won’t last as long.
Step 2: Building the Fire – Crafting the Base
Now that you’ve got your materials, it’s time to build the fire. There are several classic techniques you can use, each with its own advantages:
- The Teepee: This is the classic campfire shape that we all picture when we think of a fire. Place a bundle of tinder in the center of your fire pit, and then arrange your kindling around it in the shape of a teepee. Leave gaps between the sticks to allow air to flow in and help the fire catch. As the fire grows, slowly add larger pieces of fuel wood to the structure. The teepee shape allows the fire to burn intensely and evenly.
- The Log Cabin: This method works well when you want a fire that burns longer and steadier. Start with a small teepee of tinder and kindling in the center, then build a square around it using larger logs, like you’re constructing a miniature log cabin. The logs will stack in a crisscross pattern, allowing air to circulate and feed the flames.
- The Lean-To: For a more compact fire, use a leaning structure. Place a larger log on the ground as your base, then lean smaller pieces of wood against it in a tepee-like formation. This structure is great if you’re in a sheltered spot and don’t need as much airflow. It also makes it easier to add wood during the night without disturbing the fire too much.
Step 3: Lighting the Fire – The Spark of Life
Once your fire is built, it’s time to bring it to life. Here are some tried-and-true methods to light your campfire:
- Matches or Lighter: The simplest and most common method is using a match or a lighter. Be sure to strike the match away from the wind and light the tinder first, then gradually add kindling. A good trick is to light several areas of the tinder at once to ensure an even burn.
- Flint and Steel: For a more traditional approach, use flint and steel. Strike the steel against the flint to create sparks, and direct them toward the tinder. This method is tougher but will make you feel like a true wilderness expert. Keep practicing, and soon you’ll be starting fires like a true pioneer!
- Firestarter: If you’re looking for a shortcut (and a bit more convenience), you can use a firestarter—these can be anything from chemical firelighters to homemade fire starters made from wax and sawdust. These little fire helpers work wonders when conditions are damp or the wind is too strong.
Step 4: Maintaining the Fire – Keeping the Flames Alive
Once your fire is roaring, you’ll need to maintain it for warmth, cooking, or just good old-fashioned ambiance. Here’s how to keep your fire burning bright:
- Air Flow Is Key: A fire needs oxygen to burn properly. If the flames start to die down, gently blow on the base of the fire, or use a stick to shift the logs around and open up gaps for air. Don’t smother the fire by piling too much wood on top too quickly—let it breathe!
- Don’t Overload: While it may be tempting to keep adding logs to the fire, too much wood too quickly can suffocate the flames. Add fuel gradually, allowing the fire to catch each new log before adding more. You can always add more later when the fire is strong enough to handle it.
- Manage the Heat: If you need to reduce the intensity of the fire, simply move the logs around to let the flames cool a bit. If you want to create a hot, concentrated flame (say, for cooking or melting something), stack your logs in a pyramid shape to concentrate the heat.
Step 5: Putting Out the Fire – Safety First
When you’re done with your fire, you must put it out properly to prevent any risk of wildfires. Here’s how to ensure your fire is safely extinguished:
- Drown the Fire: Pour water directly onto the fire until it’s completely out. Make sure to pour it on the coals and ashes, not just the flames, and stir it around with a stick to make sure every bit of embers is soaked.
- Stir and Check: After you pour water on it, stir the ashes and check for any glowing embers. If they’re still glowing, add more water and stir again. When everything is cold to the touch, you’re done.
- Leave No Trace: Always make sure to clean up the fire site. Pack out any trash, broken wood, and debris, leaving the campsite just as you found it (or better!).
Final Thoughts – The Heart of the Camp
Mastering the perfect campfire isn’t just about lighting a match and setting wood on fire. It’s about knowing how to gather materials, understanding the different methods, and respecting the fire’s power. A campfire is more than just a way to stay warm—it’s the centerpiece of your outdoor experience. It’s where stories are told, marshmallows are roasted, and memories are made.
So next time you head out into the wilderness, be sure to gather your materials, build your fire with care, and let it blaze brightly as the heart of your camping adventure.
Pro Tip: Try making your own campfire stories to tell around the fire! Whether they’re spooky, funny, or full of tall tales, they’re a perfect addition to any campfire gathering.